Skip to content

XState with React for Beginners

This article was written over 18 months ago and may contain information that is out of date. Some content may be relevant but please refer to the relevant official documentation or available resources for the latest information.

Introduction

When I started to learn XState for the first time, I found the docs somewhat difficult to interpret. Perhaps this was because the docs show a number of concepts at the same time that I was not familiar with as a developer coming from a Redux or React Context background. So I decided to write this article to help others learn XState step-by-step!

What is XState?

XState is a state management library for JavaScript. The idea behind it is a little bit different than Redux or React Context as it is not necessary to use a global store or wrap the whole application in a provider. It is just a simple way to manage the state of your application, and separate the logic from the view so it helps you to write clean and readable code.

Getting started

In this tutorial, we will use XState with 3 React examples that will increase in difficulty.

Introductory level (Counter example)

In this example, we will create a simple counter application with React, and use XState to increment and decrement the counter state.

After you create a new React project using create-react-app, clean the starter template, and build this simple UI in the App.js file.

image

Now install XState, and add it using this command:

npm install xstate

Also, we will need @xstate/react to connect XState with React.

npm install @xstate/react

Now, create a new file, name it counterMachine, and add the following code:

import { createMachine, assign } from 'xstate';

export const counterMachine = createMachine({
  context: { 
    // Here, we will define the initial state of the machine
   },
  on: {
    // Here we will define the events that will trigger the transitions.
  },
});

As you can see, we are using the createMachine function from XState to create a new machine, and we are using the context property to define the initial state of the machine. Also, we are using the on property to define the events that will trigger the transitions.

Now, let's create the context (the initial state to our state machine).

context: {
  count: 0,
}

Let's add our two events to our state machine.

First event is INCREMENT, and it will increment the counter by one.

on: {
  INCREMENT: {
    actions: assign({
      count: (context) => context.count + 1,
    }),
  },
}

Second event is DECREMENT, and it will decrement the counter by one.

Then our state machine is ready. Now let's use it in our React component.

Import the useMachine hook from XState React.

import { useMachine } from '@xstate/react';

And import our state machine itself.

import counterMachine from './counterMachine';

Then, add this line inside our component:

const [state, send] = useMachine(counterMachine);

So, the useMachine hook will return an array with the current state, and the send function. And we can use the send function to trigger the events.

You can use the state in the JSX like this:

  <h1>{state.context.count}</h1>

And now, we can trigger the events:

  <button onClick={() => send('INCREMENT')}>increment</button>
  <button onClick={() => send('DECREMENT')}>decrement</button>

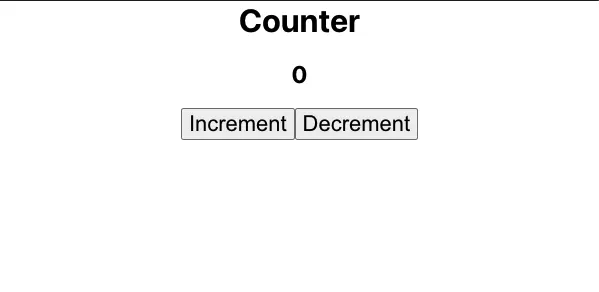
And here is the result, run npm run dev:

As you see, it's very simple. Now, let's take a step forward and create an intermediate level example.

Intermediate level (Todo example)

Now we understand how to create a state machine and how to use it in React. Let's create a Todo application to learn how to pass a payload to the state machine.

We will use a template similar to the previous one.

image

Let's start with our state machine.

First, the context of the machine will look like this:

context: {
  todos: [],
}

and the events:

on: {
  ADD_TODO: {
    actions: assign({
      todos: (context, event) => [
        ...context.todos,
        event.todo
      ],
    }),
  },
}

And this is how we will pass the payload with the send function to the state machine from the React component.

send('ADD_TODO', { todo: 'Learn XState' });

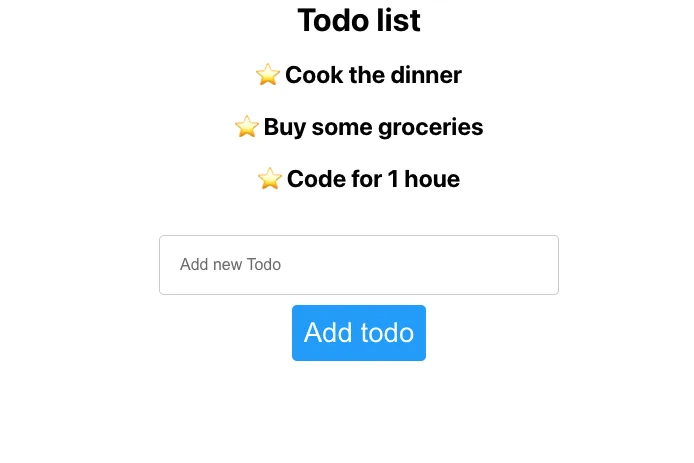
Here is the example, run npm run dev:

Try it and program the delete the todo function yourself!

Advanced level (Traffic light example)

We learned how to create a simple state machine in the first example, and learned how to pass a payload in the second example. Now, let's create a traffic light example, and learn about the states in XState state machine.

The state of the state machine is exactly like the traffic light. When the traffic light is red, the next state should be yellow, then green, then back to red again.

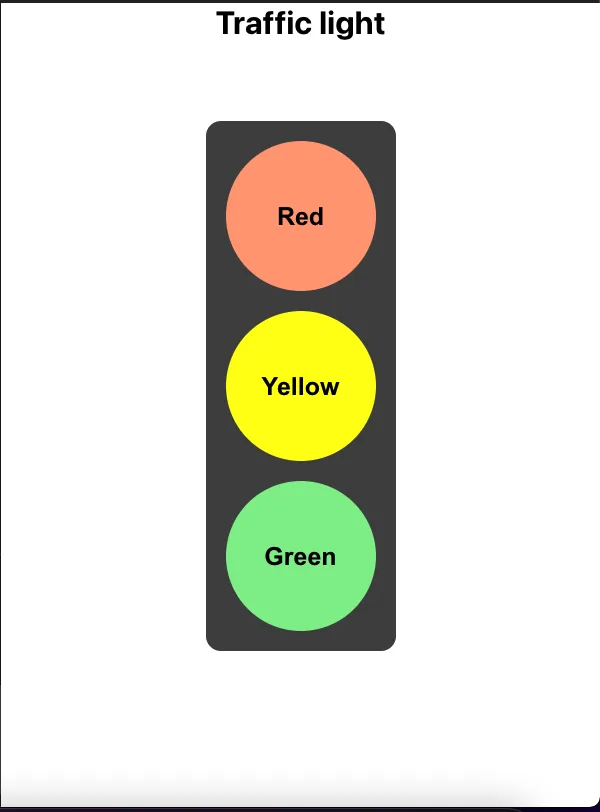
So we will create a simple UI like this with three buttons:

image

Clone the repo from GitHub

And then our state machine will be like this:

export const trafficLightMachine = createMachine({
  initial: 'red',
  states: {
    red: {
      on: {
        NEXT: {
          target: 'yellow',
        },
      },
    },
    yellow: {
      on: {
        NEXT: {
          target: 'green',
        },
      },
    },
    green: {
      on: {
        NEXT: {
          target: 'red',
        },
      },
    },
  },
});

So, as you can see, we have two new properties in the state machine. initial and states. And the initial property is the initial state of the machine. And the states property is an object that contains all the states of the machine.

And we are using only one event which is NEXT and it will trigger the transition to the next state.

So let's move on to the React component, and add the useMachine hook.

To know what the current state of our state machine is, we will use state.value.

<button
  className="red"
  disabled={state.value !== 'red'}
  onClick={() => send('NEXT')}
>
  Red
</button>

So as you see, for each color in the traffic light, we will have a button. And we will disable the button if the current state is not the same as the color. And we will add the onClick event to the button.

You can test it here, run npm run dev:

This Dot is a consultancy dedicated to guiding companies through their modernization and digital transformation journeys. Specializing in replatforming, modernizing, and launching new initiatives, we stand out by taking true ownership of your engineering projects.

We love helping teams with projects that have missed their deadlines or helping keep your strategic digital initiatives on course. Check out our case studies and our clients that trust us with their engineering.

You might also like

The HTML Dialog Element: Enhancing Accessibility and Ease of Use cover image

The HTML Dialog Element: Enhancing Accessibility and Ease of Use

The HTML Dialog Element: Enhancing Accessibility and Ease of Use Dialogs are a common component added to applications, whether on the web or in native applications. Traditionally there has not been a standard way of implementing these on the web, resulting in many ad-hoc implementations that donā€™t act consistently across different web applications. Often, commonly expected features are missing from dialogs due to the complexity of implementing them. However, web browsers now offer a standard dialog element. Why use the dialog element? The native dialog element streamlines the implementation of dialogs, modals, and other kinds of non-modal dialogs. It does this by implementing many of the features needed by dialogs for you that are already baked into the browser. This is helpful as it reduces the burden on the developer when making their applications accessible by ensuring that user expectations concerning interaction are met, and it can also potentially simplify the implementation of dialogs in general. Basic usage Adding a dialog using the new tag can be achieved with just a few lines of code. ` However, adding the dialog alone wonā€™t do anything to the page. It will show up only once you call the .showModal() method against it. ` Then if you want to close it you can call the .close() method on the dialog, or press the escape key to close it, just like most other modals work. Also, note how a backdrop appears that darkens the rest of the page and prevents you from interacting with it. Neat! Accessibility and focus management Correctly handling focus is important when making your web applications accessible to all users. Typically you have to move the current focus to the active dialog when showing them, but with the dialog element thatā€™s done for you. By default, the focus will be set on the first focusable element in the dialog. You can optionally change which element receives focus first by setting the autofocus attribute on the element you want the focus to start on, as seen in the previous example where that attribute was added to the close element. Using the .showModal() method to open the dialog also implicitly adds the dialog ARIA role to the dialog element. This helps screen readers understand that a modal has appeared and the screen so it can act accordingly. Adding forms to dialogs Forms can also be added to dialogs, and thereā€™s even a special method value for them. If you add a element with the method set to dialog then the form will have some different behaviors that differ from the standard get and post form methods. First off, no external HTTP request will be made with this new method. What will happen instead is that when the form gets submitted, the returnValue property on the form element will be set to the value of the submit button in the form. So given this example form: ` The form element with the example-form id will have its returnValue set to Submit. In addition to that, the dialog will close immediately after the submit event is done being handled, though not before automatic form validation is done. If this fails then the invalid event will be emitted. You may have already noticed one caveat to all of this. You might not want the form to close automatically when the submit handler is done running. If you perform an asynchronous request with an API or server you may want to wait for a response and show any errors that occur before dismissing the dialog. In this case, you can call event.preventDefault() in the submit event listener like so: ` Once your desired response comes back from the server, you can close it manually by using the .close() method on the dialog. Enhancing the backdrop The backdrop behind the dialog is a mostly translucent gray background by default. However, that backdrop is fully customizable using the ::backdrop pseudo-element. With it, you can set a background-color to any value you want, including gradients, images, etc. You may also want to make clicking the backdrop dismiss the modal, as this is a commonly implemented feature of them. By default, the &lt;dialog> element doesnā€™t do this for us. There are a couple of changes that we can make to the dialog to get this working. First, an event listener is needed so that we know when the user clicks away from the dialog. ` Alone this event listener looks strange. It appears to dismiss the dialog whenever the dialog is clicked, not the backdrop. Thatā€™s the opposite of what we want to do. Unfortunately, you cannot listen for a click event on the backdrop as it is considered to be part of the dialog itself. Adding this event listener by itself will effectively make clicking anywhere on the page dismiss the dialog. To correct for this we need to wrap the contents of the dialog content with another element that will effectively mask the dialog and receive the click instead. A simple element can do! ` Even this isnā€™t perfect though as the contents of the div may have elements with margins in them that will push the div down, resulting in clicks close to the edges of the dialog to dismiss it. This can be resolved by adding a couple of styles the the wrapping div that will make the margin stay contained within the wrapper element. The dialog element itself also has some default padding that will exacerbate this issue. ` The wrapping div can be made into an inline-block element to contain the margin, and by moving the padding from the parent dialog to the wrapper, clicks made in the padded portions of the dialog will now interact with the wrapper element instead ensuring it wonā€™t be dismissed. Conclusion Using the dialog element offers significant advantages for creating dialogs and modals by simplifying implementation with reasonable default behavior, enhancing accessibility for users that need assistive technologies such as screen readers by using automatic ARIA role assignment, tailored support for form elements, and flexible styling options....

How to build an AI assistant with OpenAI, Vercel AI SDK, and Ollama with Next.js cover image

How to build an AI assistant with OpenAI, Vercel AI SDK, and Ollama with Next.js

In todayā€™s blog post, weā€™ll build an AI Assistant using three different AI models: Whisper and TTS from OpenAI and Llama 3.1 from Meta. While exploring AI, I wanted to try different things and create an AI assistant that works by voice. This curiosity led me to combine OpenAIā€™s Whisper and TTS models with Metaā€™s Llama 3.1 to build a voice-activated assistant. Hereā€™s how these models will work together: * First, weā€™ll send our audio to the Whisper model, which will convert it from speech to text. * Next, weā€™ll pass that text to the Llama 3.1 model. Llama will understand the text and generate a response. * Finally, weā€™ll take Llamaā€™s response and send it to the TTS model, turning the text back into speech. Weā€™ll then stream that audio back to the client. Letā€™s dive in and start building this excellent AI Assistant! Getting started We will use different tools to build our assistant. To build our client side, we will use Next.js. However, you could choose whichever framework you prefer. To use our OpenAI models, we will use their TypeScript / JavaScript SDK. To use this API, we require the following environmental variable: OPENAI_API_KEYā€” To get this key, we need to log in to the OpenAI dashboard and find the API keys section. Here, we can generate a new key. Awesome. Now, to use our Llama 3.1 model, we will use Ollama and the Vercel AI SDK, utilizing a provider called ollama-ai-provider. Ollama will allow us to download our preferred model (we could even use a different one, like Phi) and run it locally. The Vercel SDK will facilitate its use in our Next.js project. To use Ollama, we just need to download it and choose our preferred model. For this blog post, we are going to select Llama 3.1. After installing Ollama, we can verify if it is working by opening our terminal and writing the following command: Notice that I wrote ā€œllama3.1ā€ because thatā€™s my chosen model, but you should use the one you downloaded. Kicking things off It's time to kick things off by setting up our Next.js app. Let's start with this command: ` After running the command, youā€™ll see a few prompts to set the app's details. Let's go step by step: * Name your app. * Enable app router. The other steps are optional and entirely up to you. In my case, I also chose to use TypeScript and Tailwind CSS. Now thatā€™s done, letā€™s go into our project and install the dependencies that we need to run our models: ` Building our client logic Now, our goal is to record our voice, send it to the backend, and then receive a voice response from it. To record our audio, we need to use client-side functions, which means we need to use client components. In our case, we donā€™t want to transform our whole page to use client capabilities and have the whole tree in the client bundle; instead, we would prefer to use Server components and import our client components to progressively enhance our application. So, letā€™s create a separate component that will handle the client-side logic. Inside our app folder, let's create a components folder, and here, we will be creating our component: ` Letā€™s go ahead and initialize our component. I went ahead and added a button with some styles in it: ` And then import it into our Page Server component: ` Now, if we run our app, we should see the following: Awesome! Now, our button doesnā€™t do anything, but our goal is to record our audio and send it to someplace; for that, let us create a hook that will contain our logic: ` We will use two APIs to record our voice: navigator and MediaRecorder. The navigator API will give us information about the userā€™s media devices like the user media audio, and the MediaRecorder will help us record the audio from it. This is how theyā€™re going to play out together: ` Letā€™s explain this code step by step. First, we create two new states. The first one is for keeping track of when we are recording, and the second one stores the instance of our MediaRecorder. ` Then, weā€™ll create our first method, startRecording. Here, we are going to have the logic to start recording our audio. We first check if the user has media devices available thanks to the navigator API that gives us information about the browser environment of our user: If we donā€™t have media devices to record our audio, we just return. If they do, then let us create a stream using their audio media device. ` Finally, we go ahead and create an instance of a MediaRecorder to record this audio: ` Then we need a method to stop our recording, which will be our stopRecording. Here, we will just stop our recording in case a media recorder exists. ` We are recording our audio, but we are not storing it anywhere. Letā€™s add a new useEffect and ref to accomplish this. We would need a new ref, and this is where our chunks of audio data will be stored. ` In our useEffect we are going to do two main things: store those chunks in our ref, and when it stops, we are going to create a new Blob of type audio/mp3: ` It is time to wire this hook with our AudioRecorder component: ` Letā€™s go to the other side of the coin, the backend! Setting up our Server side We want to use our models on the server to keep things safe and run faster. Letā€™s create a new route and add a handler for it using route handlers from Next.js. In our App folder, letā€™s make an ā€œApiā€ folder with the following route in it: We want to use our models on the server to keep things safe and run faster. Letā€™s create a new route and add a handler for it using route handlers from Next.js. In our App folder, letā€™s make an ā€œApiā€ folder with the following route in it: ` Our route is called ā€˜chatā€™. In the route.ts file, weā€™ll set up our handler. Letā€™s start by setting up our OpenAI SDK. ` In this route, weā€™ll send the audio from the front end as a base64 string. Then, weā€™ll receive it and turn it into a Buffer object. ` Itā€™s time to use our first model. We want to turn this audio into text and use OpenAIā€™s Whisper Speech-To-Text model. Whisper needs an audio file to create the text. Since we have a Buffer instead of a file, weā€™ll use their ā€˜toFileā€™ method to convert our audio Buffer into an audio file like this: ` Notice that we specified ā€œmp3ā€. This is one of the many extensions that the Whisper model can use. You can see the full list of supported extensions here: https://platform.openai.com/docs/api-reference/audio/createTranscription#audio-createtranscription-file Now that our file is ready, letā€™s pass it to Whisper! Using our OpenAI instance, this is how we will invoke our model: ` Thatā€™s it! Now, we can move on to the next step: using Llama 3.1 to interpret this text and give us an answer. Weā€™ll use two methods for this. First, weā€™ll use ā€˜ollamaā€™ from the ā€˜ollama-ai-providerā€™ package, which lets us use this model with our locally running Ollama. Then, weā€™ll use ā€˜generateTextā€™ from the Vercel AI SDK to generate the text. Side note: To make our Ollama run locally, we need to write the following command in the terminal: ` ` Finally, we have our last model: TTS from OpenAI. We want to reply to our user with audio, so this model will be really helpful. It will turn our text into speech: ` The TTS model will turn our response into an audio file. We want to stream this audio back to the user like this: ` And thatā€™s all the whole backend code! Now, back to the frontend to finish wiring everything up. Putting It All Together In our useRecordVoice.tsx hook, let's create a new method that will call our API endpoint. This method will also take the response back and play to the user the audio that we are streaming from the backend. ` Great! Now that weā€™re getting our streamed response, we need to handle it and play the audio back to the user. Weā€™ll use the AudioContext API for this. This API allows us to store the audio, decode it and play it to the user once itā€™s ready: ` And that's it! Now the user should hear the audio response on their device. To wrap things up, let's make our app a bit nicer by adding a little loading indicator: ` Conclusion In this blog post, we saw how combining multiple AI models can help us achieve our goals. We learned to run AI models like Llama 3.1 locally and use them in our Next.js app. We also discovered how to send audio to these models and stream back a response, playing the audio back to the user. This is just one of many ways you can use AIā€”the possibilities are endless. AI models are amazing tools that let us create things that were once hard to achieve with such quality. Thanks for reading; now, itā€™s your turn to build something amazing with AI! You can find the complete demo on GitHub: AI Assistant with Whisper TTS and Ollama using Next.js...

Redux Toolkit 2.0 release cover image

Redux Toolkit 2.0 release

Intro Redux Toolkit On December 4, 2023, Mark Erikson announced that Redux Toolkit 2.0 has been released! This change is considered a major version of the library and comes with breaking changes because, as the core team declared, it has been 4+ years since they released Redux tool kit, and they needed to clean up the code and standardize the way Redux apps are written. One of these changes is you no longer need to import the core redux library, RTK is a wrapper of it. In this article, we are going to focus on the main breaking changes and new features in RTK 2.0 Some general notes on the change * Standalone getDefaultMiddleware and getType removed * The package definitions now include an exports field to specify which artifacts to load, with a modern ESM build * UMD has been dropped * Typescript rewrite createSlice and createReducer One of the major changes is object syntax for createSlice.extraReducers and createReducer removed. In RTK 2.0, Redux team has opted to remove the 'object' form for createReducer and createSlice.extraReducers, as the 'builder callback' form offers greater flexibility and is more TypeScript-friendly, making it the preferred choice for both APIs So an example like this: ` Should be like this: ` Middlewares Now the configureStore.middleware must be a callback. Thatā€™s because before to add a middleware to the Redux store, you had to add it to the array of configureStore.middleware, but this is turning off the default middleware. Now itā€™s a callback function that should return an array with middlewares, the default middleware is being passed in the parameters of the callback function so the developer can include it or not in the middleware array like this: ` Enhancers Store enhancers are a formal mechanism for adding capabilities to Redux itself like adding some additional capabilities to the store. It could change how reducers process data, or how dispatch works. Most people will never need to write one. But similar to the middlewares, enhancers also must be a callback function that receives getDefaultEnhancers and should return enhancers back. ` autoBatchEnhancer In version 1.9.0, the Redux team introduced a new autoBatchEnhancer that, when multiple "low-priority" actions are dispatched consecutively. This enhancement aims to optimize performance by reducing the impact of UI updates, typically the most resource-intensive part of the update process. While RTK Query automatically marks most of its internal actions as "low-pri" users need to add the autoBatchEnhancer to the store for this feature to take effect. To simplify this process, configureStore has been updated to include the autoBatchEnhancer in the store setup by default, allowing users to benefit from improved performance without manual store configuration adjustments. AnyAction and UnknownAction The Redux TS types have historically exported an AnyAction type that lacks precise type safety, allowing for loose typology like console.log(action.whatever). However, to promote safer typing practices, they've introduced UnknownAction, which treats all fields beyond action.type as unknown, nudging users towards creating type guards with assertions for better type safety when accessing action objects. UnknownAction is now the default action object type in Redux, while AnyAction remains available but deprecated. RTK Query behavior They've addressed issues with RTK Query, such as problems with dispatch(endpoint.initiate(arg, {subscription: false})) and incorrect resolution timing for triggered lazy queries, by reworking RTKQ to consistently track cache entries. Additionally, they've introduced internal logic to delay tag invalidation for consecutive mutations, controlled by the new invalidationBehavior flag on createApi, with the default being 'delayed'. In RTK 1.9, the subscription status has been optimized syncing to the Redux state for performance, primarily for display in the Redux DevTools "RTK Query" panel. Conclusion This version is a major version of Redux Toolkit and it has a lot of breaking changes but what is important its source code has been cleaned and rewritten in TS will improve the developer experience for sure and on the final user experience as well, We discussed here only the headlines and the most used features but of course you can find all of the changes on The official Redux Github Releases page...

ā€œChatGPT knows me pretty wellā€¦ but it drew me as a white man with a man bun.ā€ ā€“ Angie Jones on AI Bias, DevRel, and Blockā€™s new open source AI agent ā€œgooseā€ cover image

ā€œChatGPT knows me pretty wellā€¦ but it drew me as a white man with a man bun.ā€ ā€“ Angie Jones on AI Bias, DevRel, and Blockā€™s new open source AI agent ā€œgooseā€

Angie Jones is a veteran innovator, educator, and inventor with over twenty years of industry experience and twenty-seven digital technology patents both domestically and internationally. As the VP of Developer Relations at Block, she facilitates developer training and enablement, delivering tools for developer users and open source contributors. However, her educational work doesnā€™t end with her day job. She is also a contributor to multiple books examining the intersection of technology and career, including *DevOps: Implementing Cultural Change*, and *97 Things Every Java Programmer Should Know*, and is an active speaker in the global developer conference circuit. With the release of Blockā€™s new open source AI agent ā€œgooseā€, Angie drives conversations around AIā€™s role in developer productivity, ethical practices, and the application of intelligent tooling. We had the chance to talk with her about the evolution of DevRel, what makes a great leader, emergent data governance practices, women who are crushing it right now in the industry, and more: Developer Advocacy is Mainstream A decade ago, Developer Relations (DevRel) wasnā€™t the established field it is today. It was often called Developer Evangelism, and fewer companies saw the value in having engineers speak directly to other engineers. > ā€œDeveloper Relations was more of a niche space. Itā€™s become much more mainstream these days with pretty much every developer-focused company realizing that the best way to reach developers is with their peers.ā€ That shift has opened up more opportunities for engineers who enjoy teaching, community-building, and breaking down complex technical concepts. But because DevRel straddles multiple functions, its place within an organization remains up for debateā€”should it sit within Engineering, Product, Marketing, or even its own department? Thereā€™s no single answer, but its cross-functional nature makes it a crucial bridge between technical teams and the developers they serve. Leadership Is Not an Extension of Engineering Excellence Most engineers assume that excelling as an IC is enough to prepare them for leadership, but Angie warns that this is a common misconception. Sheā€™s seen firsthand how technical skills donā€™t always equate to strong leadership abilitiesā€”weā€™ve all worked under leaders who made us wonder *how they got there*. When she was promoted into leadership, Angie was determined not to become one of those leaders: > ā€œThis required humility. Acknowledging that while I was an expert in one area, I was a novice in another.ā€ Instead of assuming leadership would come naturally, she took a deliberate approach to learningā€”taking courses, reading books, and working with executive coaches to build leadership skills the right way. Goose: An Open Source AI Assistant That Works for You At Block, Angie is working on a tool called goose, an open-source AI agent that runs locally on your machine. Unlike many AI assistants that are locked into specific platforms, goose is designed to be fully customizable: > ā€œYou can use your LLM of choice and integrate it with any API through the Model Context Protocol (MCP).ā€ That flexibility means goose can be tailored to fit developersā€™ workflows. Angie gives an example of what this looks like in action: > ā€œGoose, take this Figma file and build out all of the components for it. Check them into a new GitHub repo called @org/design-components and send a message to the #design channel in Slack informing them of the changes.ā€ And just like that, itā€™s doneā€” no manual intervention required. The Future of Data Governance As AI adoption accelerates, data governance has become a top priority for companies. Strong governance requires clear policies, security measures, and accountability. Angie points out that organizations are already making moves in this space: > ā€œCisco recently launched a product called AI Defense to help organizations enhance their data governance frameworks and ensure that AI deployments align with established data policies and compliance requirements.ā€ According to Angie, in the next five years, we can expect more structured frameworks around AI data usage, especially as businesses navigate privacy concerns and regulatory compliance. Bias in AI Career Tools: Helping or Hurting? AI-powered resume screeners and promotion predictors are becoming more common in hiring, but are they helping or hurting underrepresented groups? Angieā€™s own experience with AI bias was eye-opening: > ā€œI use ChatGPT every day. It knows me pretty well. I asked it to draw a picture of what it thinks my current life looks like, and it drew me as a white male (with a man bun).ā€ When she called it out, the AI responded: > ā€œNo, I donā€™t picture you that way at all, but it sounds like the illustration mightā€™ve leaned into the tech stereotype aesthetic a little too much.ā€ This illustrates a bigger problemā€” AI often reflects human biases at scale. However, there are emerging solutions, such as identity masking, which removes names, race, and gender markers so that only skills are evaluated. > ā€œIn scenarios like this, minorities are given a fairer shot.ā€ Itā€™s a step toward a more equitable hiring process, but it also surfaces the need for constant vigilance in AI development to prevent harmful biases. Women at the Forefront of AI Innovation While AI is reshaping nearly every industry, women are playing a leading role in its development. Angie highlights several technologists: > ā€œIā€™m so proud to see women are already at the forefront of AI innovation. I see amazing women leading AI research, training, and development such as Mira Murati, Timnit Gebru, Joelle Pineau, Meredith Whittaker, and even Blockā€™s own VP of Data & AI, Jackie Brosamer.ā€ These women are influencing not just the technical advancements in AI but also the ethical considerations that come with it. Connect with Angie Angie Jones is an undeniable pillar of the online JavaScript community, and it isnā€™t hard to connect with her! You can find Angie on X (Twitter), Linkedin, or on her personal site (where you can also access her free Linkedin Courses). Learn more about goose by Block....

Let's innovate together!

We're ready to be your trusted technical partners in your digital innovation journey.

Whether it's modernization or custom software solutions, our team of experts can guide you through best practices and how to build scalable, performant software that lasts.

Prefer email? hi@thisdot.co