
Communication Between Client Components in Next.js
In recent years, Next.js has become one of the most popular React frameworks for building server-rendered applications. With the introduction of the App Router in Next.js 13, the framework has taken a major leap forward by embracing a new approach to building web applications: the concept of server components and client components. This separation of concerns allows developers to strategically decide which parts of their application should be rendered on the server and which are then hydrated in the browser for interactivity.
The Challenge: Communicating Between Client Components
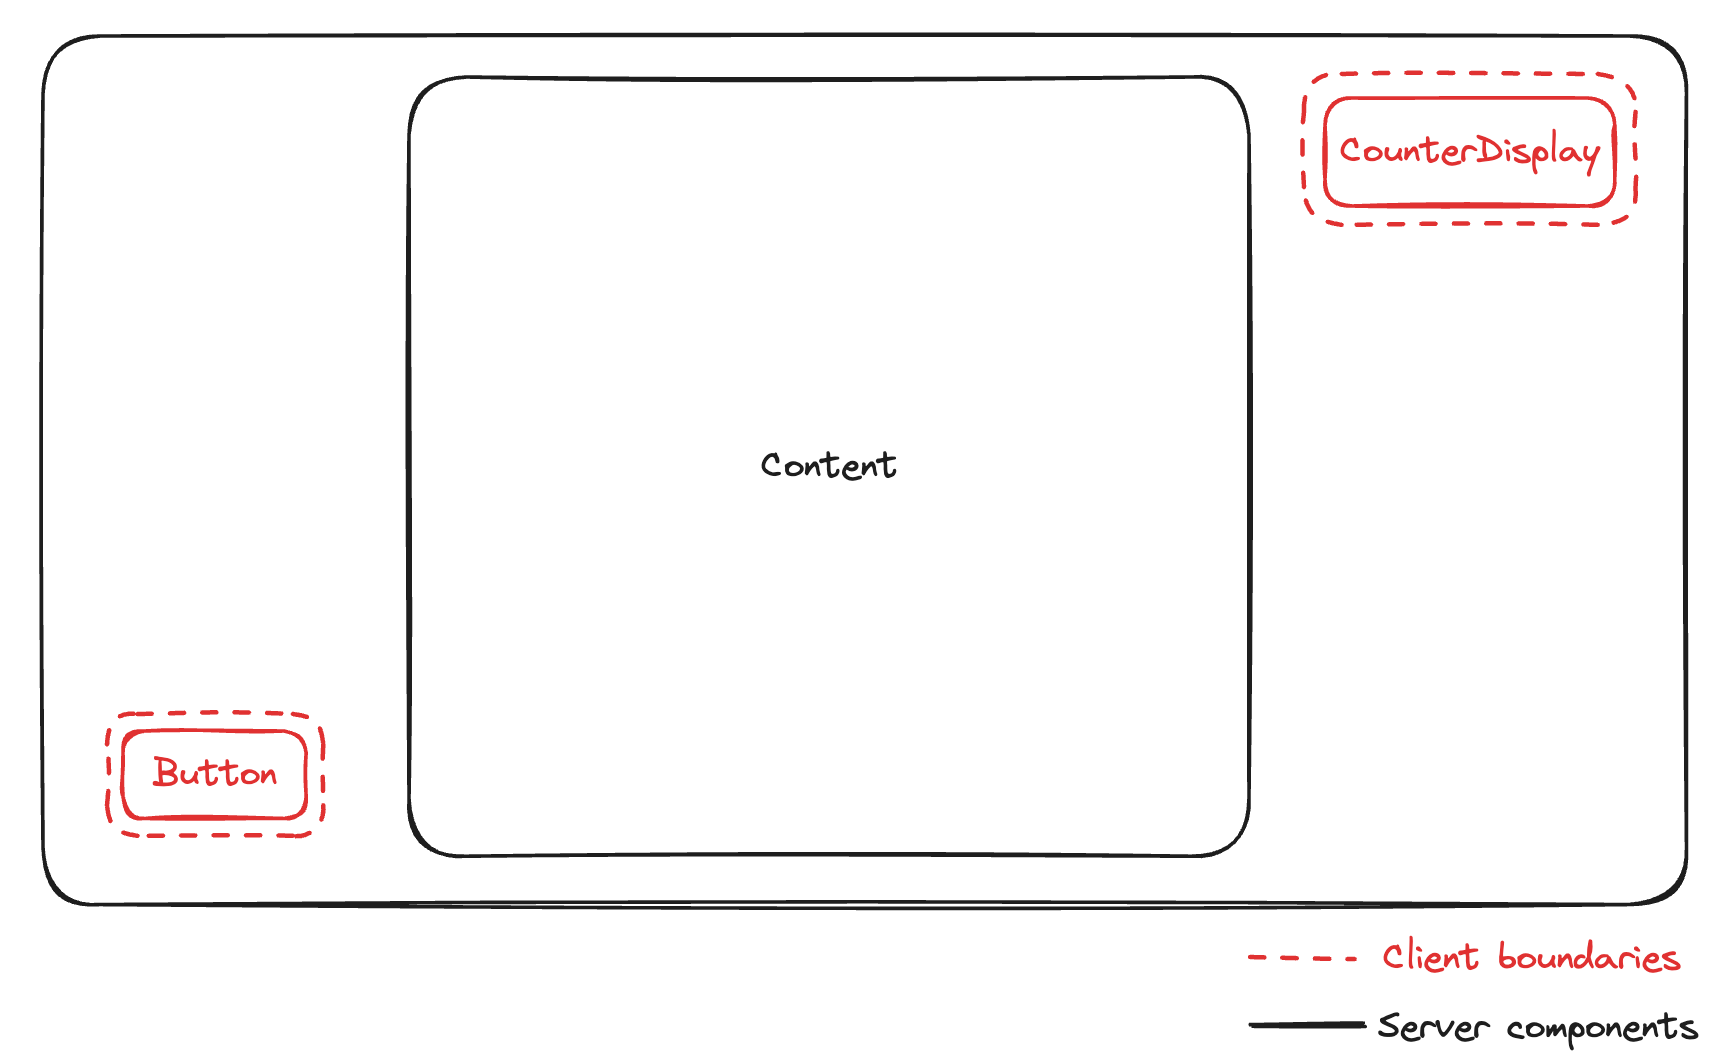
While server components offer numerous benefits, they also introduce a new challenge: how can client components within different boundaries communicate with each other? For instance, let's consider a scenario where you have a button (a client component) and a separate client component that displays the number of times the button has been clicked.
In a regular React application, this would typically be accomplished by lifting the state to a common ancestor component, allowing the button to update the state, which is then passed down to the counter display component.
However, the traditional approach may not be as straightforward in a Next.js application that heavily relies on server components, with client components scattered across the page. This blog post will explore three ways to facilitate communication between client components in Next.js, depending on where you want to store the state.
Lifting State to a Common Client Component
One approach to communicating between client components is to lift the state to a common client component. This could be a React context provider, a state management system like Zustand, or any other solution that allows you to share state across components.
The key aspect is that this wrapper component should be higher up in the tree (perhaps even in the layout) and accept server components as children. Next.js allows you to interleave client and server components as much as you want, as long as server components are passed to client components as props or as component children.
Here's how this approach might look in practice. First of all, we'd create a wrapper client component that holds the state:
// app/common-client-component/components/wrapper-component.tsx
"use client";

import { createContext, useState } from "react";

type WrapperContextValue = {
  counterValue: number;
  increaseCounter: () => void;
};

export const WrapperContext = createContext<WrapperContextValue>({
  counterValue: 0,
  increaseCounter: () => {},
});

export interface WrapperComponentProps {
  children?: React.ReactNode;
}

export default function WrapperComponent({ children }: WrapperComponentProps) {
  const [counterValue, setCounterValue] = useState(0);

  return (
    <WrapperContext.Provider
      value={{
        counterValue,
        increaseCounter: () => {
          setCounterValue((prev) => prev + 1);
        },
      }}
    >
      {children}
    </WrapperContext.Provider>
  );
}
This wrapper component can be included in the layout:
// app/common-client-component/layout.tsx
import WrapperComponent from "@/app/common-client-component/components/wrapper-component";

export default function CommonClientComponentLayout({
  children,
}: Readonly<{
  children: React.ReactNode;
}>) {
  return (
    <div>
      <h1>Common Client Component Layout</h1>
      <WrapperComponent>{children}</WrapperComponent>
    </div>
  );
}
Any server components can be rendered within the layout, potentially nesting them several levels deep. Finally, we'd create two client components, one for the button and one for the counter display:
// app/common-client-component/components/button.tsx
"use client";
import { WrapperContext } from "@/app/common-client-component/components/wrapper-component";
import { useContext } from "react";

export default function Button() {
  const { increaseCounter } = useContext(WrapperContext);

  return <button onClick={increaseCounter}>Click me</button>;
}
// app/common-client-component/components/counter-display.tsx
"use client";
import { useContext } from "react";
import { WrapperContext } from "@/app/common-client-component/components/wrapper-component";

export default function CounterDisplay() {
  const { counterValue } = useContext(WrapperContext);

  return (
    <div>
      <h2>Counter Display</h2>
      <p>Times clicked: {counterValue}</p>
    </div>
  );
}
The entire client and server component tree is rendered on the server, and the client components are then hydrated in the browser and initialized. From then on, the communication between the client components works just like in any regular React application.
Check out the page using this pattern in the embedded Stackblitz window below:
Using Query Params for State Management
Another approach is to use query params instead of a wrapper client component and store the state in the URL. In this scenario, you have two client components: the button and the counter display. The counter value (the state) is stored in a query param, such as counterValue.
The client components can read the current counter value using the useSearchParams hook. Once read, the useRouter hook can update the query param, effectively updating the counter value.
However, there's one gotcha to this approach. If a route is statically rendered, calling useSearchParams will cause the client component tree up to the closest Suspense boundary to be client-side rendered. Next.js recommends wrapping the client component that uses useSearchParams in a <Suspense/> boundary.
Here's an example of how this approach might look. The button reads the current counter value and updates it on click by using the router's replace function:
// app/using-query-params/components/button.tsx
"use client";
import { useSearchParams, useRouter } from "next/navigation";

export default function Button() {
  const router = useRouter();
  const searchParams = useSearchParams();
  const currentValue = searchParams.get("counterValue") || "0";

  const handleClick = () => {
    const newValue = parseInt(currentValue) + 1;
    const newSearchParams = new URLSearchParams(searchParams.toString());
    newSearchParams.set("counterValue", newValue.toString());
    router.replace(`?${newSearchParams.toString()}`);
  };

  return <button onClick={handleClick}>Increment</button>;
}
The counter display component is relatively simple, only reading the counter value:
// app/using-query-params/components/counter-display.tsx
"use client";
import { useSearchParams } from "next/navigation";

export default function CounterDisplay() {
  const searchParams = useSearchParams();
  const currentValue = searchParams.get("counterValue") || "0";

  return <div>Counter Value: {currentValue}</div>;
}
And here is the page that is a server component, hosting both of the above client components:
// app/using-query-params/page.tsx
import CounterDisplay from "@/app/using-query-params/components/counter-display";
import Button from "@/app/using-query-params/components/button";
import { Suspense } from "react";

export default function UsingQueryParamsPage() {
  return (
    <div>
      <h1>Using Query Params Page</h1>
      <Suspense>
        <CounterDisplay />
      </Suspense>
      <p>Some content goes here</p>
      <Suspense>
        <Button />
      </Suspense>
    </div>
  );
}
Feel free to check out the above page in the embedded Stackblitz below:
Storing State on the Server
The third approach is to store the state on the server. In this case, the counter display component accepts the counter value as a prop, where the counter value is passed by a parent server component that reads the counter value from the database.
The button component, when clicked, calls a server action that updates the counter value and calls revalidatePath() so that the counter value is refreshed, and consequently, the counter display component is re-rendered.
It's worth noting that in this approach, unless you need some interactivity in the counter display component, it doesn't need to be a client component – it can be purely server-rendered.
However, if both components need to be client components, here's an example of how this approach might look. First, we'll implement a server action that updates the counter value. We won't get into the mechanics of updating it, which in a real app would require a call to the database or an external API - so we're only commenting that part. After that, we revalidate the path so that the Next.js caches are purged, and the counter value is retrieved again in server components that read it.
// app/storing-state-on-server/actions/actions.ts
"use server";

import { revalidatePath } from "next/cache";

export async function incrementCounterAction() {
  // Call API/database to increment counter value

  // Revalidate the path to purge the caches and re-fetch the data
  revalidatePath("/storing-state-on-server");
}
The button is a simple client component that calls the above server action when clicked.
// app/storing-state-on-server/components/button.tsx
"use client";
import { incrementCounterAction } from "@/app/storing-state-on-server/actions/actions";

export default function Button() {
  const handleClick = async () => {
    await incrementCounterAction();
  };

  return <button onClick={handleClick}>Increment</button>;
}
The counter display component reads the counter value from the parent:
// app/storing-state-on-server/components/counter-display.tsx
"use client";

export type CounterDisplayProps = {
  counterValue: number;
};

export default function CounterDisplay({ counterValue }: CounterDisplayProps) {
  return <div>Counter Value: {counterValue}</div>;
}
While the parent is a server component that reads the counter value from the database or an external API.
// app/storing-state-on-server/page.tsx
import CounterDisplay from "@/app/storing-state-on-server/components/counter-display";
import Button from "@/app/storing-state-on-server/components/button";

async function getCounterValue() {
  return Promise.resolve(0); // This would be an API/database call in a real app
}

export default async function StoringStateOnServerPage() {
  const counterValue = await getCounterValue();
  return (
    <div>
      <h1>Storing State on Server Page</h1>
      <CounterDisplay counterValue={counterValue} />
      <p>Some content goes here</p>
      <Button />
    </div>
  );
}
This pattern can be seen in the embedded Stackblitz below:
Conclusion
Next.js is a powerful framework that offers various choices for implementing communication patterns between client components. Whether you lift state to a common client component, use query params for state management, or store the state on the server, Next.js provides all the tools you need to add a communication path between two separate client component boundaries.
We hope this blog post has been useful in demonstrating how to facilitate communication between client components in Next.js. Check out other Next.js blog posts we've written for more insights and best practices. You can also view the entire codebase for the above snippets on StackBlitz.