Skip to content

Building a Stripe App: A Step-by-Step Guide to QR Code Generation

Building a Stripe App: A Step-by-Step Guide to QR Code Generation

Why Build a Stripe App?

I recently participated in an audio space with the Stripe team, and something they said really stuck with me: the Stripe app store is a growing area that isn't overly saturated yet. There's a lot of potential for new apps, and companies can use this opportunity to grow.

I work at a company called This Dot Labs, and we've created several Stripe apps and even own one. After looking at the data, I can confirm that the Stripe team was right!

Creating a QR Code Generator App

For this tutorial, we'll build a QR code app that can take a URL and generate a code for it. This is a good use case to help you understand the ins and outs of Stripe's developer tools. stripeQRCode

Why QR Codes?

QR codes are useful tools that have become common in e-commerce, restaurants, and other industries. While Stripe already has a QR code tool, we'll make our own to familiarize ourselves with their syntax and problem-solving approaches.

Project Structure

Before we dive into the implementation, let's look at the structure of our Stripe App QR Code project:

  • .vscode: Contains settings for Visual Studio Code
  • source/views: Holds the main application views
  • .gitignore: Specifies files to ignore in version control
  • stripe-app.json: Defines the Stripe app configuration
  • ui-extensions.d.ts: TypeScript declaration file for UI extensions
  • .build: this is where the built Stripe app gets placed. image (85)

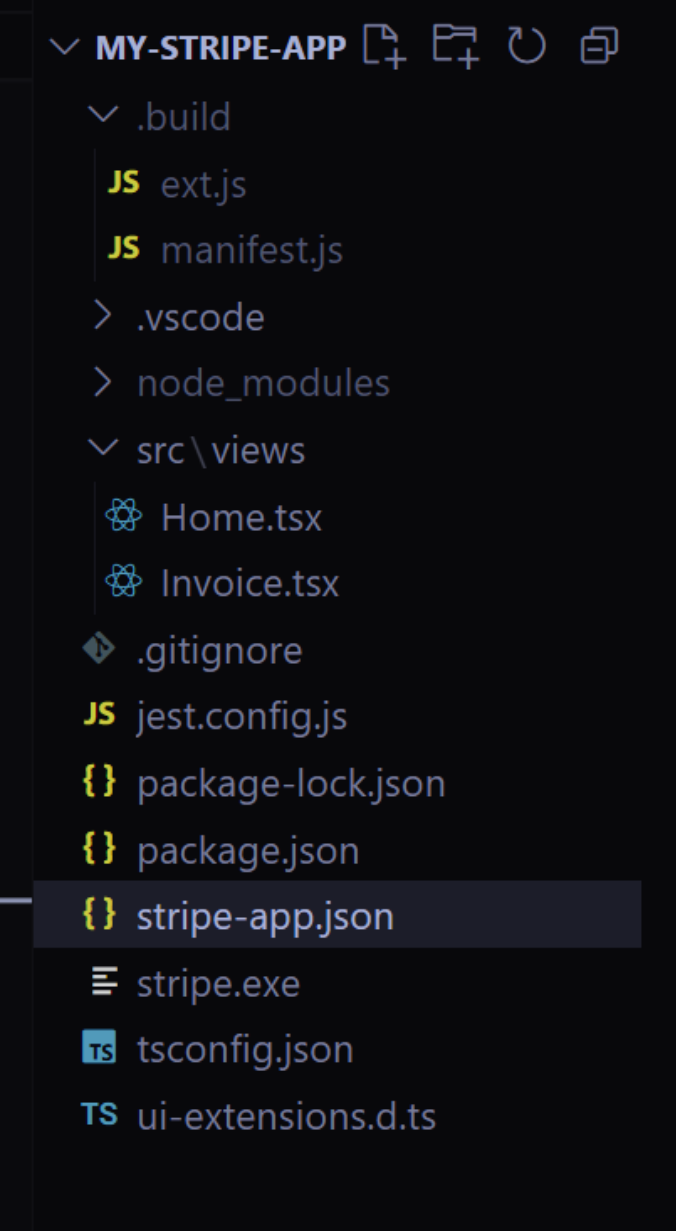
Step-by-Step Implementation

1. Install Stripe Locally

First, you need to install Stripe on your local machine. The documentation provides great instructions for this:

  • For Mac users: Use Brew to install
  • For Windows users: Download the package and add it to your environment variables

You can find the details here in the stripe docs to install the Stripe CLI https://docs.stripe.com/stripe-cli

When using Windows, you must do stripe login from Powershell, NOT from Git bash or any other tool. After the server is up, then you can continue using git bash for everything else. After stripe login, you need to enter stripe apps start. Once you do that, the server is up and running and you can go back to using git bash or any other tool.

2. Install Dependencies

We'll be using an extra package for QR code generation. Install it using npm:

npm install qrcode

3. Set Up the Main Component

Let's look at the home.tsx file, where we'll use Stripe's UI components:

import { Box, ContextView, Button, TextField, Banner } from 
'@stripe/ui-extension-sdk/ui';

These components are similar to other UI libraries like Bootstrap or Tailwind CSS.

4. Create the UI Structure

Our app will have:

  • An input field for the URL
  • Validation using a regex pattern
  • Error handling for invalid URLs
  • QR code generation and display

Here is the Home.tsx file that is located in the src/views folder image (86)

import {
  Box,
  ContextView,
  Button,
  TextField,
  Img,
  Banner,
} from "@stripe/ui-extension-sdk/ui";
import { useState } from 'react';
import QRCode from 'qrcode';
const Home = () => {
  const [url, setUrl] = useState('');
  const [qrCode, setQrCode] = useState('');
  const [error, setError] = useState('');
  const generateQRCode = async () => {
    try {
      if (!url) {
        setError("Please enter a URL.");
        return;
      }
//basic regex pattern for URL validation
      const urlPattern = new RegExp(
        '^(https?:\\/\\/)?' +
        '((([a-z\\d]([a-z\\d-]*[a-z\\d])*)\\.)+[a-z]{2,}|' +
        '((\\d{1,3}\\.){3}\\d{1,3}))' +
        '(\\:\\d+)?(\\/[-a-z\\d%_.~+]*)*' +
        '(\\?[;&a-z\\d%_.~+=-]*)?' +
        '(\\#[-a-z\\d_]*)?', 'i'
      );
      if (!urlPattern.test(url)) {
        setError("Please enter a valid URL (e.g., https://example.com)");
        return;
      }
      const qrCodeDataUrl = await QRCode.toDataURL(url, {
        width: 200,
        margin: 2,
      });
      setQrCode(qrCodeDataUrl);
      setError('');
    } catch (error) {
      console.error("Error generating QR code", error);
      setError("Failed to generate QR Code. Please try again.");
    }
  };
  return (
    <ContextView
      title="URL QR Code Generator"
      brandColor="#635bff"
      externalLink={{
        label: "Stripe Docs",
        href: "https://stripe.com/docs",
      }}
    >
      <Box css={{ stack: "y", rowGap: "large", padding: "medium" }}>
        <Box css={{ font: "heading", marginBottom: "medium" }}>
          Generate User Payment QR Code
        </Box>
        <TextField
          label="Enter URL"
          placeholder="https://example.com"
          value={url}
          onChange={(e) => setUrl(e.target.value)}
          type="url"
        />
        {error && (
          <Banner
            type="critical"
            title="Error"
            description={error}
          />
        )}
        <Button
          type="primary"
          onPress={() => generateQRCode()}
          disabled={!url}
        >
          Generate QR Code
        </Button>
        {qrCode && (
          <Box css={{
            stack: "y",
            rowGap: "medium",
            alignSelfY: "center",
            marginTop: "large"
          }}>
            <Box css={{ font: "heading" }}>Your QR Code</Box>
            <Img
              src={qrCode}
              alt="Generated QR Code"
            />
            <Button
              type="secondary"
              onPress={() => {
                window.open(qrCode, '_blank');
              }}
            >
              Download QR Code
            </Button>
          </Box>
        )}
      </Box>
    </ContextView>
  );
};
export default Home;
  • ContextView` is at the top level of the app where we see the Title and the link to the Stripe Docs that we placed in our Context View.
  • Box is how you use Divs.
  • Banners can be used to show notification errors or any other item you wish to display.
  • Textfields are input fields.
  • Everything else is pretty self-explanatory.

5. Handle Content Security Policy

One problem I personally ran into was when I tried to redirect users, the Stripe policies would block it since I did not express that I knew what it was doing. I had to go into the stripe-app.json file and mention the specific security policies. For this particular exercise, I kept these as null.

This is my stripe-app.json file.

{
    "id": "com.example.my-stripe-app",
    "version": "0.0.1",
    "name": "My Stripe App",
    "icon": "",
    "permissions": [],
    "stripe_api_access_type": "platform",
    "ui_extension": {
        "views": [
            {
                "viewport": "stripe.dashboard.home.overview",
                "component": "Home"
            },
            {
                "viewport": "stripe.dashboard.invoice.detail",
                "component": "Invoice"
            }
        ],
        "content_security_policy": {
            "connect-src": null,
            "image-src": null,
            "purpose": ""
        }
    }
}

6. Configure App Views

As you can see here, the stripe-app.json file shows the views for each file I have. The Home.tsx file and the Invoice.tsx are also included This is our way of saying that for each view we have, show the app functionality on that page. Our stripe-app.json file will show it but also, the manifest.js file in our .build folder will also show the same. Any view that doesn't have a file will not show the application's functionality. So, if I were to go to transactions, the app would not show the same logic as the home or invoices page.

By following these steps, you'll have a fully functional QR code generator app for Stripe. This is just a simple example, but the potential for Stripe apps is massive, especially for businesses serving e-commerce customers.

If you need help or get stuck, don't hesitate to reach out, danny.thompson@thisdot.co. The Stripe team is also very active in answering questions, so leverage them as a resource. Happy coding!

This Dot is a consultancy dedicated to guiding companies through their modernization and digital transformation journeys. Specializing in replatforming, modernizing, and launching new initiatives, we stand out by taking true ownership of your engineering projects.

We love helping teams with projects that have missed their deadlines or helping keep your strategic digital initiatives on course. Check out our case studies and our clients that trust us with their engineering.

You might also like

Internationalization in Next.js with next-intl cover image

Internationalization in Next.js with next-intl

Internationalization in Next.js with next-intl Internationalization (i18n) is essential for providing a multi-language experience for global applications. next-intl integrates well with Next.js’ App Router, handling i18n routing, locale detection, and dynamic configuration. This guide will walk you through setting up i18n in Next.js using next-intl for URL-based routing, user-specific settings, and domain-based locale routing. Getting Started First, create a Next.js app with the App Router and install next-intl: ` Next, configure next-intl in the next.config.ts file to provide a request-specific i18n configuration for Server Components: ` Without i18n Routing Setting up an app without i18n routing integration can be advantageous in scenarios where you want to provide a locale to next-intl based on user-specific settings or when your app supports only a single language. This approach offers the simplest way to begin using next-intl, as it requires no changes to your app’s structure, making it an ideal choice for straightforward implementations. ` Here’s a quick explanation of each file's role: * translations/: Stores different translations per language (e.g., en.json for English, es.json for Spanish). Organize this as needed, e.g., translations/en/common.json. * request.ts: Manages locale-based configuration scoped to each request. Setup request.ts for Request-Specific Configuration Since we will be using features from next-intl in Server Components, we need to add the following configuration in i18n/request.ts: ` Here, we define a static locale and use that to determine which translation file to import. The imported JSON data is stored in the message variable, and is returned together with the locale so that we can access them from various components in the application. Using Translation in RootLayout Inside RootLayout, we use getLocale() to retrieve the static locale and set the document language for SEO and pass translations to NextIntlClientProvider: ` Note that NextIntlClientProvider automatically inherits configuration from i18n/request.ts here, but messages must be explicitly passed. Now you can use translations and other functionality from next-intl in your components: ` In case of async components, you can use the awaitable getTranslations function instead: ` And with that, you have i18n configured and working on your application! \ Now, let’s take it a step further by introducing routing. \ With i18n Routing To set up i18n routing, we need a file structure that separates each language configuration and translation file. Below is the recommended structure: ` We updated the earlier structure to include some files that we require for routing: * routing.ts: Sets up locales, default language, and routing, shared between middleware and navigation. * middleware.ts: Handles URL rewrites and locale negotiation. * app/[locale]/: Creates dynamic routes for each locale like /en/about and /es/about. Define Routing Configuration in i18n/routing.ts The routing.ts file configures supported locales and the default locale, which is referenced by middleware.ts and other navigation functions: ` This configuration lets Next.js handle URL paths like /about, with locale management managed by next-intl. Update request.ts for Request-Specific Configuration We need to update the getRequestConfig function from the above implementation in i18n/request.ts. ` Here, request.ts ensures that each request loads the correct translation files based on the user’s locale or falls back to the default. Setup Middleware for Locale Matching The middleware.ts file matches the locale based on the request: ` Middleware handles locale matches and redirects to localized paths like /en or /es. Updating the RootLayout file Inside RootLayout, we use the locale from params (matched by middleware) instead of calling getLocale() ` The locale we get from the params was matched in the middleware.ts file and we use that here to set the document language for SEO purposes. Additionally, we used this file to pass configuration from i18n/request.ts to Client Components through NextIntlClientProvider. Note: When using the above setup with i18n routing, next-intl will currently opt into dynamic rendering when APIs like useTranslations are used in Server Components. next-intl provides a temporary API that can be used to enable static rendering. Static Rendering for i18n Routes For apps with dynamic routes, use generateStaticParams to pass all possible locale values, allowing Next.js to render at build time: ` next-intl provides an API setRequestLocale that can be used to distribute the locale that is received via params in layouts and pages for usage in all Server Components that are rendered as part of the request. You need to call this function in every layout/page that you intend to enable static rendering for since Next.js can render layouts and pages independently. ` Note: Call setRequestLocale before invoking useTranslations or getMessages or any next-intl functions. Domain Routing For domain-specific locale support, use the domains setting to map domains to locales, such as us.example.com/en or ca.example.com/fr. ` This setup allows you to serve localized content based on domains. Read more on domain routing here. Conclusion Setting up internationalization in Next.js with next-intl provides a modular way to handle URL-based routing, user-defined locales, and domain-specific configurations. Whether you need URL-based routing or a straightforward single-locale setup, next-intl adapts to fit diverse i18n needs. With these tools, your app will be ready to deliver a seamless multi-language experience to users worldwide....

Let's innovate together!

We're ready to be your trusted technical partners in your digital innovation journey.

Whether it's modernization or custom software solutions, our team of experts can guide you through best practices and how to build scalable, performant software that lasts.

Prefer email? hi@thisdot.co